The cPanel Mail Server Hardening Checklist I Never Skip
You work hard for your business, and all the while leads are slipping away — leads that never reached you — because of how the email server was set up. And the greater irony? Nobody knows it’s happening.
One of my clients recently asked me to diagnose a problem. The message was short:
“Hi Daanial, we’re not receiving email sometimes from one particular sender. Can you please look into it and fix or diagnose what’s wrong?”
Simple enough. So I opened the mail logs — and my heart sank. More than 8,000 emails had been discarded at the SMTP level: refused at the front door before they ever reached a single inbox. The customer had no idea. As far as they could tell, those messages were simply never sent.
That is the quiet killer of email hosting. It isn’t a dramatic outage you can see — it’s a loss of revenue you never knew you had.
That afternoon is exactly why I built the checklist in this article. It’s a must-read for email hosting providers, and a good read for anyone who cares whether email actually gets delivered. Below is every step I now run on a cPanel mail server before it ever touches a customer’s domain — written in plain language, so anyone on your team can follow it, not just the Linux folks.
Note: every IP address, hostname, and server name in the screenshots has been blurred or replaced with a placeholder like <ADMIN_IP>. Use your own real values when you set this up.
First, think in layers — not one magic switch
The biggest mistake I see is treating email security as a single setting. It isn’t. A hardened mail server checks every message at several points, like a building with a guest list, a metal detector, and a locked back door. If one layer misses something, the next one catches it.
Here is the journey every incoming email takes once we’re done:
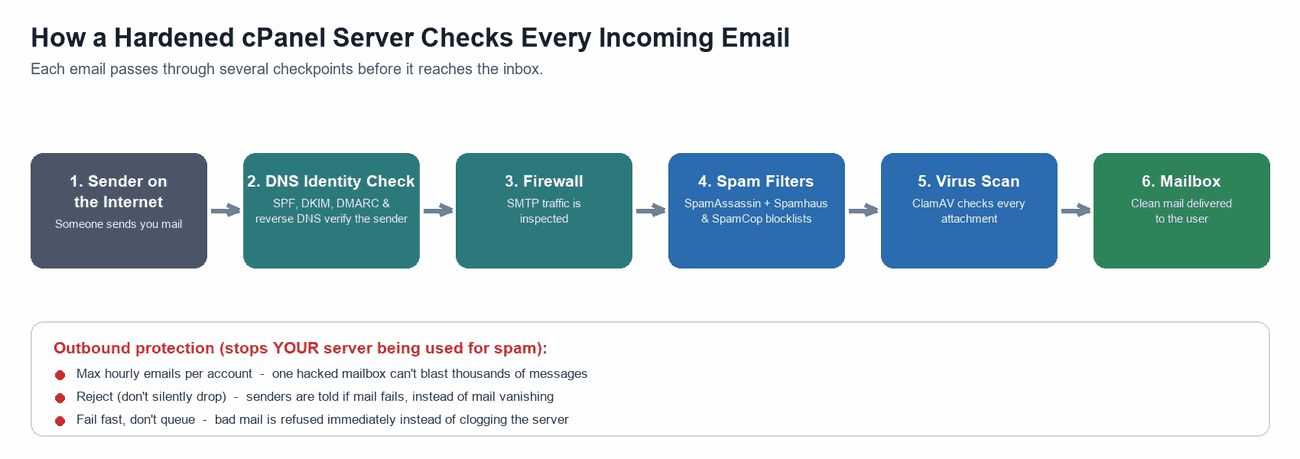
Keep that picture in mind. The steps below simply switch on each checkpoint, one at a time.
Step 1 — Switch on the spam engine
The first thing I do is turn on Apache SpamAssassin for the whole server. This is the engine that reads each message and gives it a “spam score” based on hundreds of clues. Out of the box it’s often off, or only on for some accounts. I force it on globally so no mailbox is left unprotected.
In WHM, go to Home › Email › Apache SpamAssassin, and turn Forced Global ON.
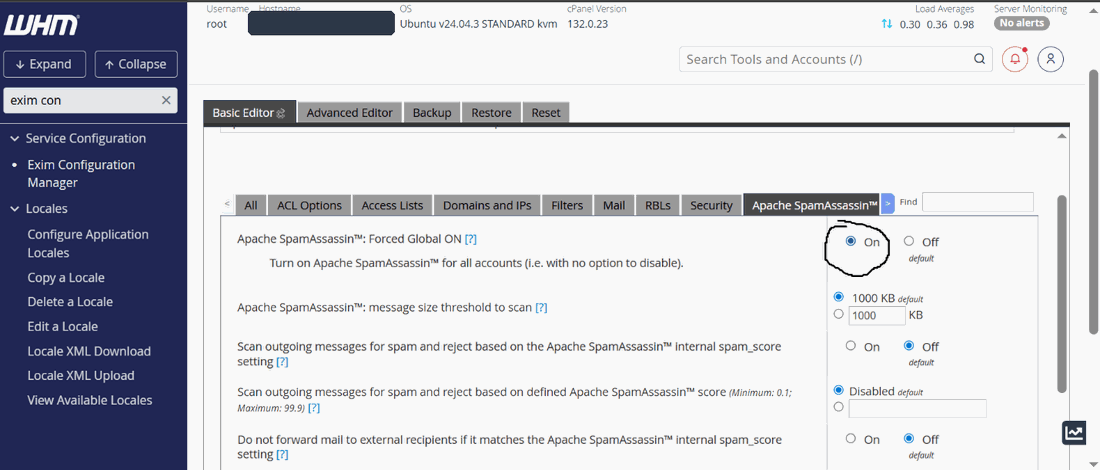
Plain takeaway: this is the smoke detector for email. Everything that follows builds on it.
Step 2 — Tune the spam score so you don’t lose real mail
A spam filter that’s too aggressive is worse than no filter, because it eats real email — a customer’s order confirmation disappears and nobody knows why. So after switching the engine on, I set the sensitivity carefully.
In cPanel, under Spam Filters › Spam Threshold Score, I set it to “Passive — Only Very Obvious Spam (10)”. The higher the number, the more lenient the filter. A value of 10 means only the most blatantly spammy messages get flagged, which almost guarantees a real email is never thrown away by mistake.
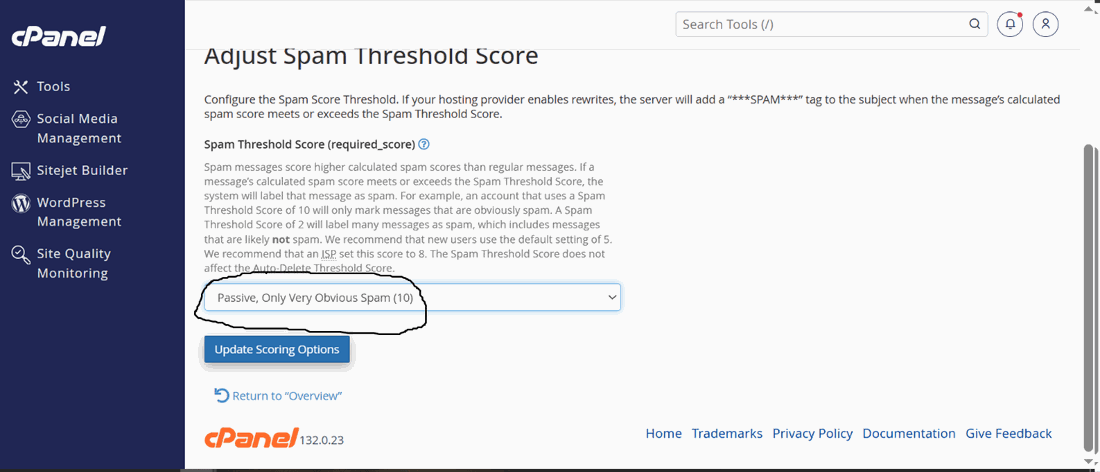
Plain takeaway: start lenient. You can always tighten later — but you can never un-lose a customer’s email.
Step 3 — Add the global “known bad sender” lists
SpamAssassin reads the content of a message. Blocklists (also called RBLs) work differently — they’re shared, worldwide lists of IP addresses already caught sending spam. I switch on the two I trust most: Spamhaus and SpamCop. If a sender is on the list, we refuse the message at the front door before it wastes any resources.
In WHM this lives under Exim Configuration Manager › RBLs.
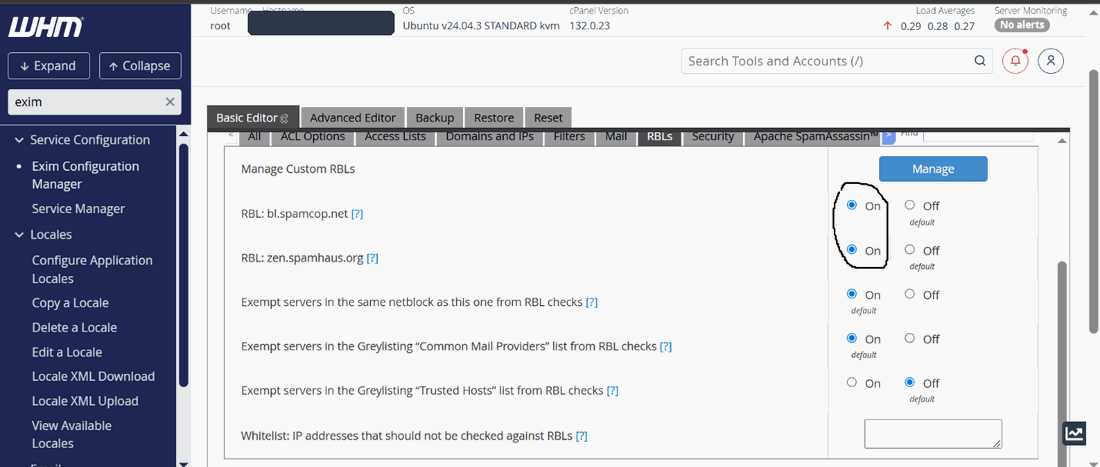
One catch that trips up almost everyone: Spamhaus refuses to answer if you query it through a public DNS service like Google’s 8.8.8.8. The server must ask using its own local DNS resolver. That’s why, on every box, I run a local resolver and point the server at itself:
# point the server at its own resolver
rm -f /etc/resolv.conf
echo "nameserver 127.0.0.1" > /etc/resolv.conf
chattr +i /etc/resolv.conf   # lock the file so nothing overwrites it
Then I prove it actually works. This test query should return a result; if it does, the blocklist is reachable and answering:
dig @127.0.0.1 2.0.0.127.zen.spamhaus.org +shortPlain takeaway: blocklists stop the worst senders for free — but only if your server asks them the right way. Always test, don’t assume.
Step 4 — Make the server verify DKIM on incoming mail
DKIM is a digital signature that legitimate senders attach to their email. Verifying it on incoming mail lets the server confirm a message really came from who it claims, and wasn’t forged or tampered with on the way. It’s a small switch that quietly blocks a whole category of impersonation.
Find it in WHM under Exim Configuration Manager › Basic Editor, and allow DKIM verification for incoming messages.
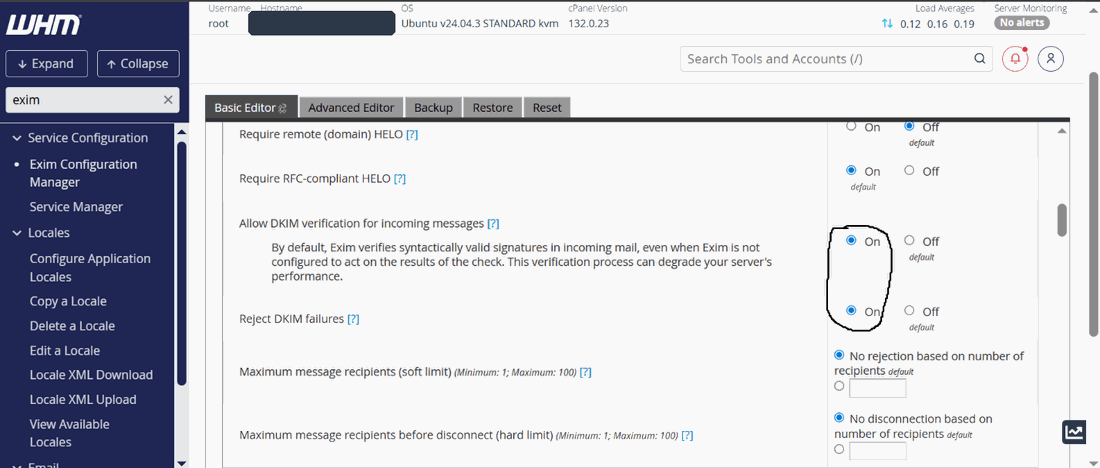
Plain takeaway: this is how the server checks a sender’s ID card instead of taking their word for it.
Step 5 — Put a guard on attachments (antivirus)
Spam is annoying; a virus is a liability. I install an antivirus/anti-malware scanner (ClamAV) so every attachment is checked before it lands in a mailbox. In WHM you add it from Home › cPanel › Manage Plugins.
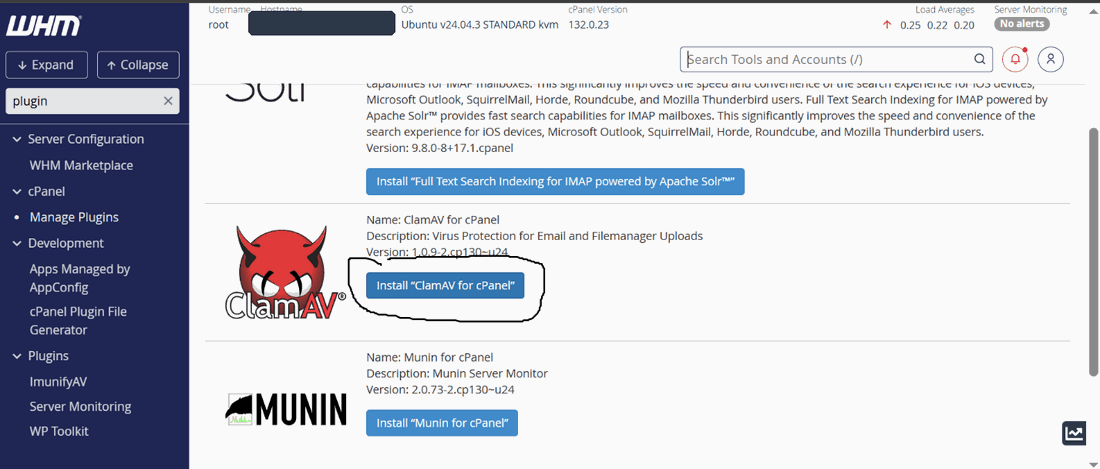
Plain takeaway: the metal detector for attachments. Set it once, and it protects every user.
Step 6 — Stop your own server from becoming the spammer
Here’s the scenario that gets servers blocklisted: one mailbox password leaks, an attacker logs in, and the server happily sends tens of thousands of spam messages in an hour. Everything so far protects against mail coming IN. This step protects the world from mail going OUT of a compromised account — and protects your IP reputation.
Three settings, all in WHM under Tweak Settings, do the heavy lifting:
- Cap hourly emails per account. If a mailbox suddenly tries to send thousands of messages, the server stops it. One hacked account can no longer blast the internet.
- Reject mail instead of silently dropping it. If a message can’t be delivered, the sender is told. Silent dropping means email vanishes and nobody knows why — a support nightmare.
- Fail immediately instead of queueing. Bad mail is refused on the spot rather than piling up in a queue and dragging the server down.
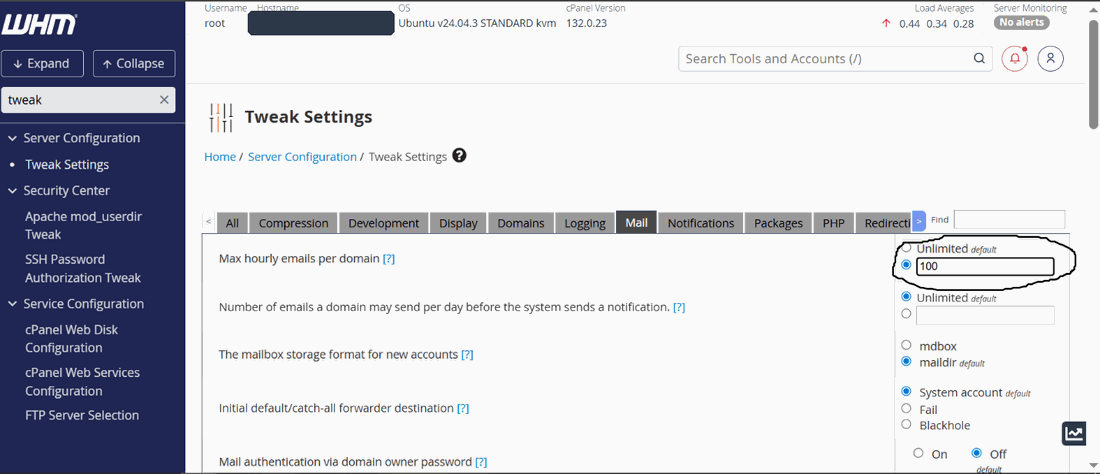
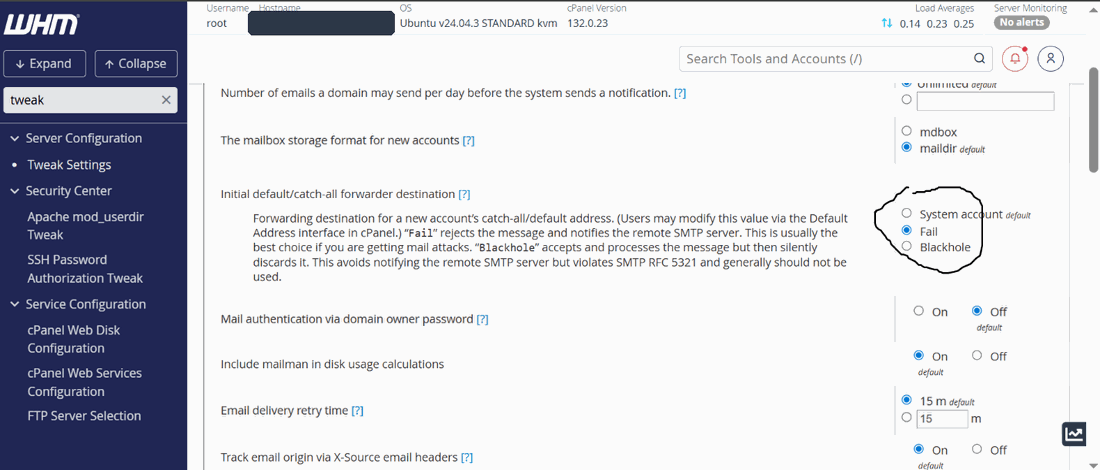
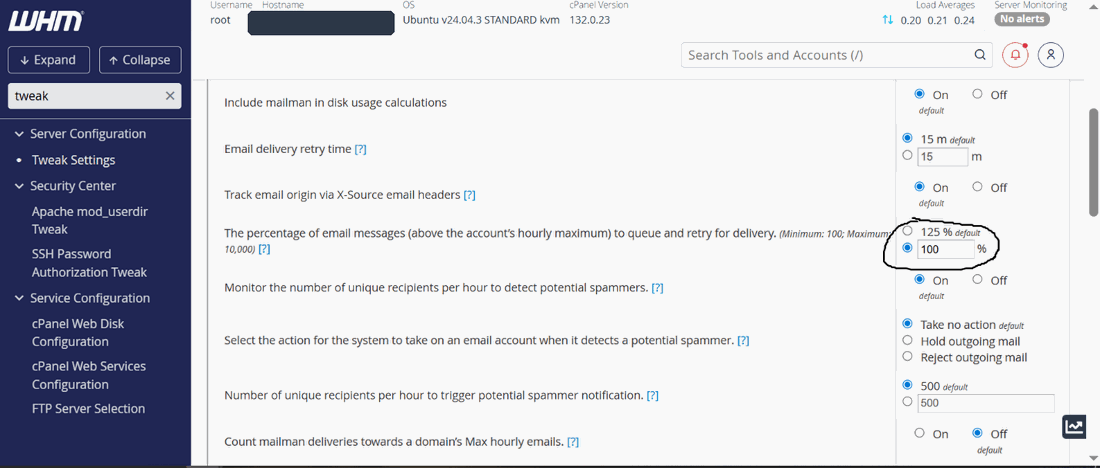
Plain takeaway: a good host doesn’t just block incoming spam — it makes sure it can never be the SOURCE of spam.
Step 7 — Get the server’s identity right
Big mail providers are suspicious of servers that look anonymous or misconfigured. A few identity basics make the difference between “delivered” and “spam folder.” I always set:
- A real hostname. Change the default name to a proper one like
your-host.example.com. - Matching reverse DNS (PTR). Ask your datacenter to make the IP point back to that same hostname. Mismatched reverse DNS is an instant spam signal.
- A fresh SSL certificate. In cPanel under SSL, remove the old certificate and request a new one so webmail and secure mail connections are trusted.
- The correct server time. Wrong clocks break signatures and confuse spam filters.
- A complete DNS record set: A records (root, www, mail, webmail), an MX record, and — most importantly — SPF, DKIM, and DMARC.
Those last three are the trust trio for outgoing email: SPF says which servers may send for your domain, DKIM signs your messages so they can’t be forged, and DMARC tells the world what to do if a message fails those checks. Skip them and your mail lands in spam, full stop.
One more Exim tweak I never miss: under WHM › Exim, reject remote mail sent to the server’s own hostname. It’s a common spammer trick, and blocking it costs nothing.
Plain takeaway: a server with a clean, honest identity gets trusted. One that looks anonymous gets filtered.
Step 8 — Lock the doors (firewall rules)
Now we decide who is even allowed to knock. I think of the firewall as a guest list for the building: visitors come in through their own doors, the control room opens only for staff, and every other door stays locked.
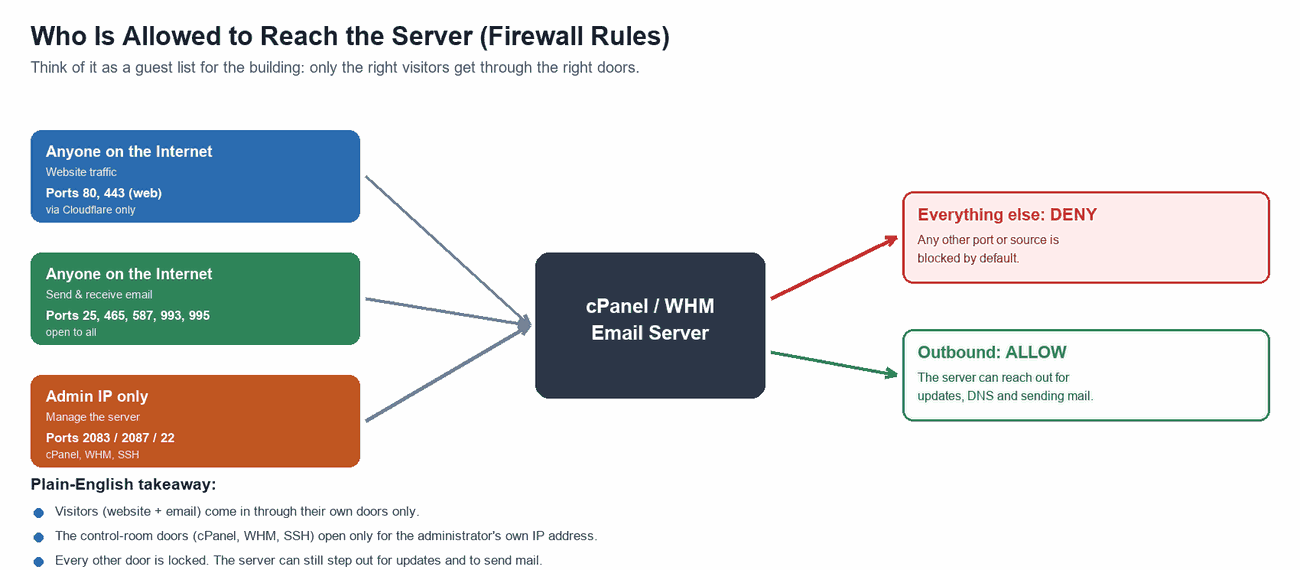
In practice that means:
- Website traffic (ports 80 and 443) is allowed in — ideally only from Cloudflare’s IP ranges, so the origin is never hit directly.
- Email ports (25, 465, 587, 993, 995) are open to everyone, because mail can arrive from anywhere.
- Control panels and SSH (cPanel 2083, WHM 2087, SSH 22) are restricted to the administrator’s own IP address only.
- Everything else is denied by default, while the server is still free to make outbound connections for updates and sending mail.
One more lock I never skip: turn on Two-Factor Authentication (MFA) for WHM. In WHM, go to Home › Security Center › Two-Factor Authentication, enable it, and set it up for the root and reseller logins. Now even if someone steals the admin password and is coming from an allowed IP, they still can’t get in without the one-time code from your phone. It’s the difference between one lock on the control-room door and two.
Plain takeaway: open the doors people actually need, lock the rest, add a second lock (MFA) on the admin door, and never expose your control panels to the whole internet.
Step 9 — Make webmail fast and reliable
Security that makes email painfully slow won’t last — users route around it. A few tuning tweaks keep things snappy under load. In the Dovecot configuration I set sensible limits so logins stay quick even when lots of people check mail at once:
- Disable IPv6 if you don’t use it, to avoid slow connection timeouts.
- Spare auth processes: 10, and max auth processes: 100, so logins never wait in line.
- LMTP concurrency and cache tuned so mail is handed off and delivered smoothly.
- Mailbox compression set to a balanced level to save disk without burning CPU.
I also raise the PHP limits (max execution time 300s, memory 512 MB, upload and POST size 100 MB) so webmail and apps don’t choke on larger messages. And for a lighter Roundcube webmail experience on an email-only box, I stop the cPanel PHP-FPM daemon service under WHM › Service Manager.
Plain takeaway: a hardened server should still feel fast. Tuning is part of the job, not an afterthought.
Step 10 — The gotcha that bites everyone: port 25
Remember the 8,000 emails my client lost at the start of this article? This is the kind of thing that causes it. Mail “just hangs” — no error, no bounce, it simply never arrives — and the server itself looks spotless. The problem is upstream: the datacenter’s network can quietly drop inbound connections on port 25 before they ever reach your server, so messages are discarded at the SMTP level and nobody is told.
So now it’s a standing item on my checklist: ask your datacenter or NOC team to whitelist inbound SMTP (port 25) for your server’s IP, so legitimate mail is never dropped at the network edge.
Before you make that call, confirm what you’re actually seeing. This pulls the recent SMTP DATA-phase timeouts and dropped-connection events out of the Exim mail log — the exact fingerprint of mail being killed mid-delivery:
grep -i "data timeout" /var/log/exim_mainlog | tail -10If you see lines like “SMTP data timeout (message abandoned)”, the mail was reaching your server but getting cut off mid-transfer — a classic sign the problem is the network path (a firewall or edge device), not the mailbox.
Plain takeaway: sometimes the mail server is perfect and the network is the villain. Check the logs, then rule out the edge before you tear apart the server.
Step 11 — Prove it works, then keep it current
A checklist isn’t done until you’ve verified it and made sure it stays done. I force a full cPanel update so every component is patched:
/usr/local/cpanel/scripts/upcp --forceThen I confirm the automatic update job is scheduled, so the server keeps patching itself going forward:
grep -R "upcp" /etc/cron* /var/spool/cron* 2>/dev/nullPlain takeaway: hardening is not a one-time event. Verify today, and let the server keep itself updated tomorrow.
Frequently Asked Questions
Will turning all this on accidentally block my customers’ real email?
Not if you follow the order above. The spam threshold is set lenient (10) specifically to avoid false positives, and the blocklists only refuse senders already known worldwide for spam. The far bigger risk to deliverability is doing nothing — a default server with no SPF/DKIM/DMARC is what really lands in spam.
Do I need a paid spam filter or antivirus?
No. Everything here — SpamAssassin, Spamhaus, SpamCop, ClamAV, SPF/DKIM/DMARC — is built into cPanel/WHM or free to enable. Paid add-ons can help at scale, but this baseline costs nothing and stops the vast majority of problems.
Why restrict cPanel and WHM to one IP? My team works from everywhere.
Admin panels are the keys to the whole server, so exposing them to the entire internet invites brute-force attacks. Lock them to known office or VPN IPs. If your team is mobile, put them behind a VPN and allow that VPN’s IP — you still get one trusted door instead of a wide-open one.
My server still got blocklisted. Now what?
Work backwards: confirm outbound rate limits are on (Step 6), find and secure the compromised account, then request delisting from the blocklist (Spamhaus and others have removal forms). The rate limits are what stop it from happening again.
How often should I run this checklist?
Run the full list on every new server before it goes live. On existing servers, re-check it after any major cPanel upgrade, and let the automatic updates from Step 11 handle the day-to-day patching.
The bottom line
None of these steps is hard on its own. The value is in doing all of them, every time, in the same order — so no server ever ships with the factory defaults still on. That one afternoon with a blocklisted customer taught me that “it works” and “it’s ready” are two very different things.
Turn this into your team’s standard, and email stops being the thing you firefight — and becomes the thing that just works.
Grab the checklist: a printable PDF version of this entire hardening checklist is yours to download. Keep it next to you and tick the boxes on your next build.