Your Customer Thinks Their Site Has HTTPS. It Probably Doesn’t.
A presales story about the Cloudflare SSL setting almost everyone gets wrong — and how to verify, with proof, that you’ve actually fixed it.
A few weeks ago, I was in a workshop with a customer’s CTO and his technical team. The room was confident. They had spent the last month tightening their stack, ticking off security items one by one. Authentication — done. WAF rules — done. Logging — done.
Then I got to the question I always ask: “Is encryption in place?”
“Yes,” the CTO said. “We’re on HTTPS.”
“How are you managing it?”
“Through Cloudflare.”
It was an incomplete answer, and I wanted to clear my own head, so I asked the obvious follow-up: “How?”
“We’ve enabled Cloudflare’s free SSL by keeping the proxy on.”
“And?”
The CTO looked at me. “And what?”
Everyone in the room turned to me. I looked back at them — in shock.
Because what they had configured wasn’t end-to-end encryption. It was something much weaker. And every single person in that room thought it was the same thing.
This article is for every CTO, architect, and engineer who has ever clicked the orange cloud icon, switched on Cloudflare SSL, and assumed the job was finished. It isn’t. And the gap between what you think you have and what you actually have is exactly the kind of gap attackers wait for.
I’ll walk you through the misconception, the fix, and — critically — how to verify that the fix actually works. I even set this up on quabin.com, so every command and screenshot below is from a real, running production configuration.
The Misconception That Lives Behind the Orange Cloud
If you believe you are protected just because you proxied your domain through Cloudflare and “SSL is in place,” you are doing half the work. And in cyber security, half the work is no work.
Here’s why.
When you put Cloudflare in front of your website, two distinct network connections come into existence — not one:
- Visitor → Cloudflare — the browser talks to Cloudflare’s edge.
- Cloudflare → Origin — Cloudflare talks to your actual server (your VM on AWS, Hetzner, your hosting provider, wherever it lives).
The padlock you see in the browser bar reflects only the first connection. It tells the user nothing — absolutely nothing — about what happens between Cloudflare and your origin server.
Most teams configure the first connection correctly and never look at the second one. And that’s where the breakdown lives.
If the second leg is unencrypted, your traffic — login credentials, customer PII, session tokens, payment data, whatever flows through — passes through every router, ISP, and intermediate network between Cloudflare’s data center and yours, in plaintext. A man-in-the-middle on any of those hops can read it, modify it, or sell it on the dark web. We hear about these breaches every quarter. This is one of the ways they happen.
The Four Cloudflare SSL Modes — and Which One You’re Actually On
Cloudflare offers five SSL/TLS settings — one automatic and four manual. Most teams never look past the one they picked on day one, and that early choice is usually wrong for production.
1. Automatic — This is now Cloudflare’s default mode, and it’s quietly impressive engineering. For years Cloudflare ran a separate tool called SSL Recommender that scanned each origin’s TLS capability and prompted the user to pick the safest setting. Most users ignored the prompts. So Cloudflare went a step further: Automatic mode now performs that same check on every site by default. The moment it detects an origin that can handle TLS, it upgrades the connection to Full (option 4 below) — without breaking the site or surfacing a single certificate error to the user. It’s the kind of pragmatic engineering most platforms don’t bother to ship.
2. Off — No encryption anywhere. Self-explanatory. Don’t use this in production.
3. Flexible — Encrypted from visitor to Cloudflare. Plaintext from Cloudflare to your origin. This is the trap. The browser shows the padlock. The user feels safe. Your traffic is exposed on the back half of the journey.
4. Full — Encrypted both legs. But Cloudflare does not validate your origin’s certificate. A self-signed certificate works. So does an expired one. So does an attacker’s certificate if they manage to intercept the connection. Better than Flexible — but still vulnerable to man-in-the-middle (MitM) attacks. If you assume no one would bother running such an attack on your traffic — that assumption is exactly the false sense of security this mode creates.
5. Full (Strict) — Encrypted both legs and Cloudflare validates the origin’s certificate against a trusted chain. This is real end-to-end TLS. This is what your CTO thinks you have when they say “we’re on HTTPS via Cloudflare”.
Most teams I work with are on Flexible or Full when they think they are on Full (Strict). They click the orange cloud, see the padlock, ship, and move on.
What the CTO Thought vs. What Actually Happened
Here is the picture the CTO had in his head:
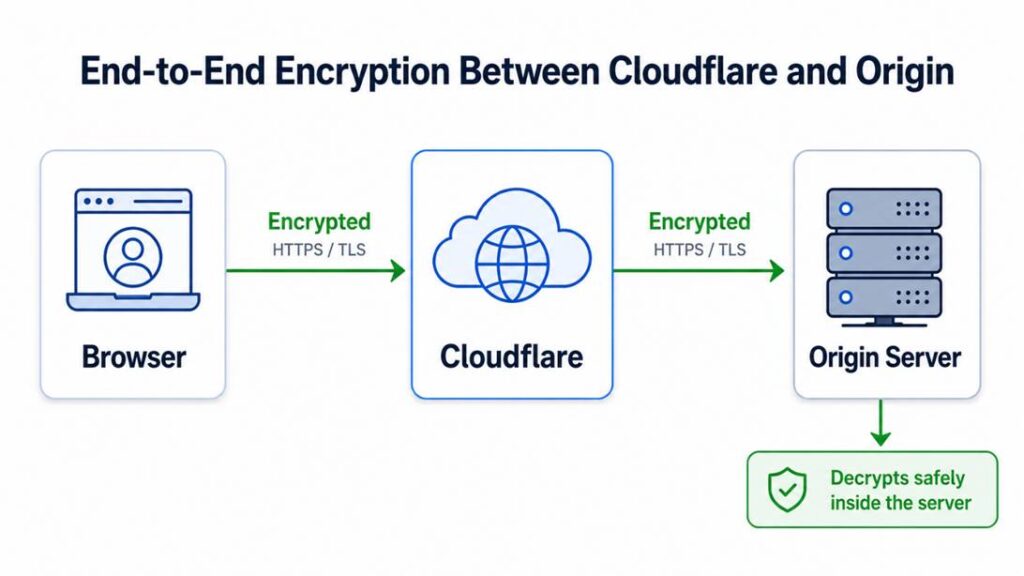
This is Full (Strict) mode. End-to-end (E2E) TLS. The architecture is sound. No plaintext anywhere on the wire.
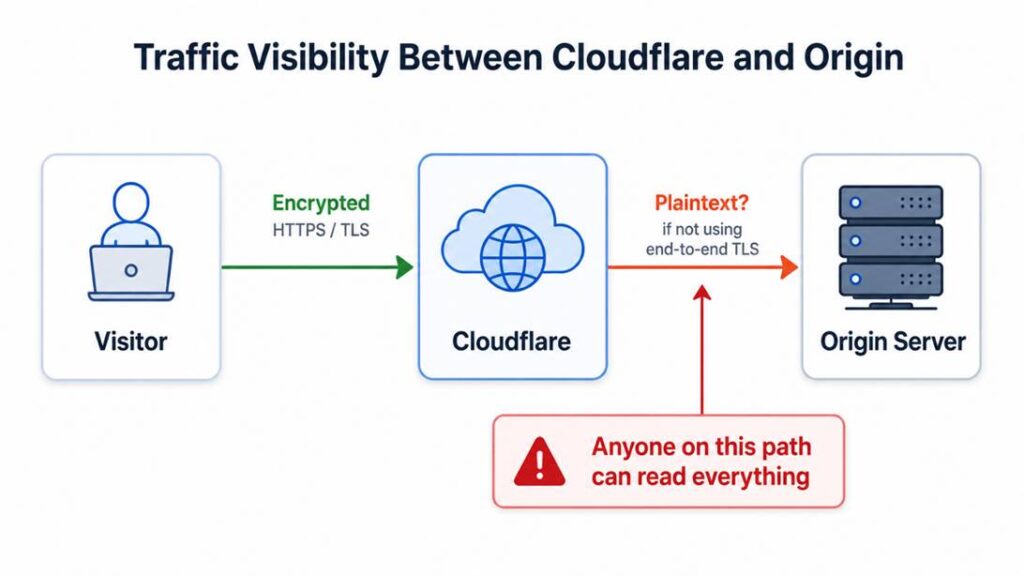
Here is what was actually configured:

This is Flexible mode. The encrypted leg ends at Cloudflare’s edge. From Cloudflare onwards, the traffic flows in clear plain text across the public internet to wherever the origin lives.
The terminology we use in security — “end-to-end encryption (E2E)” — was not fulfilled. The architecture was not secure. And finding the origin to attack it is not hard: an attacker can pull historical DNS records, scan certificate transparency logs, or use a handful of well-known reconnaissance techniques to identify the hosting data center, then probe the network path for an exposed link.
For any enterprise that genuinely needs to protect data in transit — and that means anyone handling cardholder data under PCI DSS, healthcare data under HIPAA, or personal data under GDPR/ISO-27018 — Full (Strict) is the only correct setting. The others are not options. They are gaps.
I Want to Honor Cloudflare Here
The work those engineers do is excellent. Cloudflare has done more to make HTTPS accessible to the average website than almost any other company on the internet.
The reason Flexible mode exists is practical: many origins genuinely cannot run TLS on day one, and Cloudflare offers Flexible so those sites can still get partial protection while they figure the rest out. If Cloudflare forced Full (Strict) as a default, a large share of new users would hit complex certificate errors on day one and walk away. The setting exists for a real reason.
The core issue is that teams pick it as a permanent solution, and tell themselves they are “fully encrypted”. I once flagged this exact pattern at another organization — only to find that their third-party security audit had missed it entirely, with the “encryption in transit” checkbox ticked clean in the final report.
Whenever I sit with a customer, I push to understand the traffic flow from origin to destination — every hop, every termination, every place encryption begins and ends. That single discipline surfaces more architecture problems and produces better solutions than almost any other discovery exercise I do.
How to Actually Fix This
If you read this and you don’t know which mode you’re in, you’re probably not on Full (Strict). Here is how to get there.
Step 1: Generate an origin certificate.
The easiest path is Cloudflare’s Origin CA. It’s free, available from inside your Cloudflare dashboard under SSL/TLS → Origin Server → Create Certificate, and the certificate is valid for up to 15 years. The defaults are fine: RSA 2048, hostnames yourdomain.com and *.yourdomain.com.
When the certificate generates, Cloudflare will display two text blocks: the Origin Certificate and the Private Key. Save both to plain text files immediately. Cloudflare will never show the private key again, and losing it means regenerating from scratch.
Step 2: Install the certificate on your origin server.
For nginx, point ssl_certificate and ssl_certificate_key at the new files and reload. For Apache, the equivalent SSLCertificateFile and SSLCertificateKeyFile directives. On managed hosts like Hostinger, look for SSL → Install Custom SSL, paste the certificate and private key into the corresponding fields, and leave the CA bundle field empty. Cloudflare Origin Certificates do not require a CA bundle because they are not meant to be publicly trusted — only Cloudflare’s infrastructure trusts them. That’s the whole point.
Step 3: Switch the Cloudflare SSL/TLS mode to Full (Strict).
In your Cloudflare dashboard, navigate to SSL/TLS → Overview, and select Full (Strict). This is the single click that matters most. If your origin certificate is installed correctly, your site will continue loading without errors. If it isn’t, you’ll see a 525 SSL Handshake Failed error — which is itself a useful signal that the cert install needs revisiting.
Step 4: Verify with curl.
This step is where most tutorials stop and where mine starts. Open a terminal and run:
curl -vk --head --resolve yourdomain.com:443:YOUR_ORIGIN_IP https://yourdomain.comThe –resolve flag tells curl to bypass Cloudflare and connect directly to your origin server’s IP, while still requesting your domain name. The -k flag tells curl to proceed even if the certificate is not trusted by your local machine.
You should see two things in the output:
- A successful TLS handshake followed by HTTP/1.1 200 OK (or whatever status your homepage returns)
- Response headers identifying your origin — for example, Server: LiteSpeed, platform: hostinger, or whatever your stack reports
Here’s the output:
* Trying 141.xxx.xx.xxx:443…
* Connected to yourdomain.com (141.xxx.xx.xxx) port 443
< HTTP/1.1 200 OK
< Server: LiteSpeed
< platform: hostinger
< X-LiteSpeed-Cache: hit
< alt-svc: h3=”:443″; ma=2592000
The handshake succeeded over TLS, the origin returned a clean 200, and the response identifies Hostinger’s LiteSpeed server. That confirms the Cloudflare Origin Certificate is installed and being served correctly.
Now run the same command without the -k flag:
curl -v --resolve yourdomain.com:443:YOUR_ORIGIN_IP https://yourdomain.comYou should now see a failure with this kind of error:
schannel: SEC_E_UNTRUSTED_ROOT (0x80090325) – The certificate chain was issued by an authority that is not trusted.
This error is not a bug. It is the verification.
What it means: the Cloudflare Origin Certificate is signed by Cloudflare Origin CA, which is intentionally not trusted by browsers, operating systems, or any public PKI. Only Cloudflare’s edge servers trust it. So, when you connect directly to your origin, your local machine correctly says “I don’t recognize this CA, refusing to trust this connection.”
That’s exactly the design. It means:
- Random visitors who somehow discover your origin IP and try to connect directly will be rejected by their own TLS clients
- Only traffic flowing through Cloudflare will accept the certificate and proceed
- Combined with Full (Strict) at the edge, you now have a closed loop — Cloudflare trusts only your origin cert, and only Cloudflare’s edge talks to your origin
If you ran this curl test and the TLS handshake succeeded without `-k`, that means your origin is serving a publicly trusted certificate (Let’s Encrypt, your host’s default SSL, etc.) — which is fine but means you have not yet swapped to the Cloudflare Origin Certificate. Go back and reinstall.
Step 5 (bonus): Lock the origin down further.
Enable Authenticated Origin Pulls in Cloudflare so your origin will refuse any connection that does not present a Cloudflare client certificate. Combined with Full (Strict), this gives you mutual TLS between Cloudflare and your origin — even an attacker who got hold of your origin IP and somehow worked around the cert validation problem could not establish a connection.
The whole exercise takes an experienced engineer about an hour. Most teams put it off for years.
“But My Browser Shows a Different Certificate Than the One I Installed”
This is the question every careful reader asks after walking through the fix. I asked it myself.
You install the Cloudflare Origin Certificate on your server. You set Full (Strict). You open your site in a browser, click the padlock — and see a certificate issued by Let’s Encrypt, not Cloudflare.
Did the installation fail? No. This is correct, and here’s why:
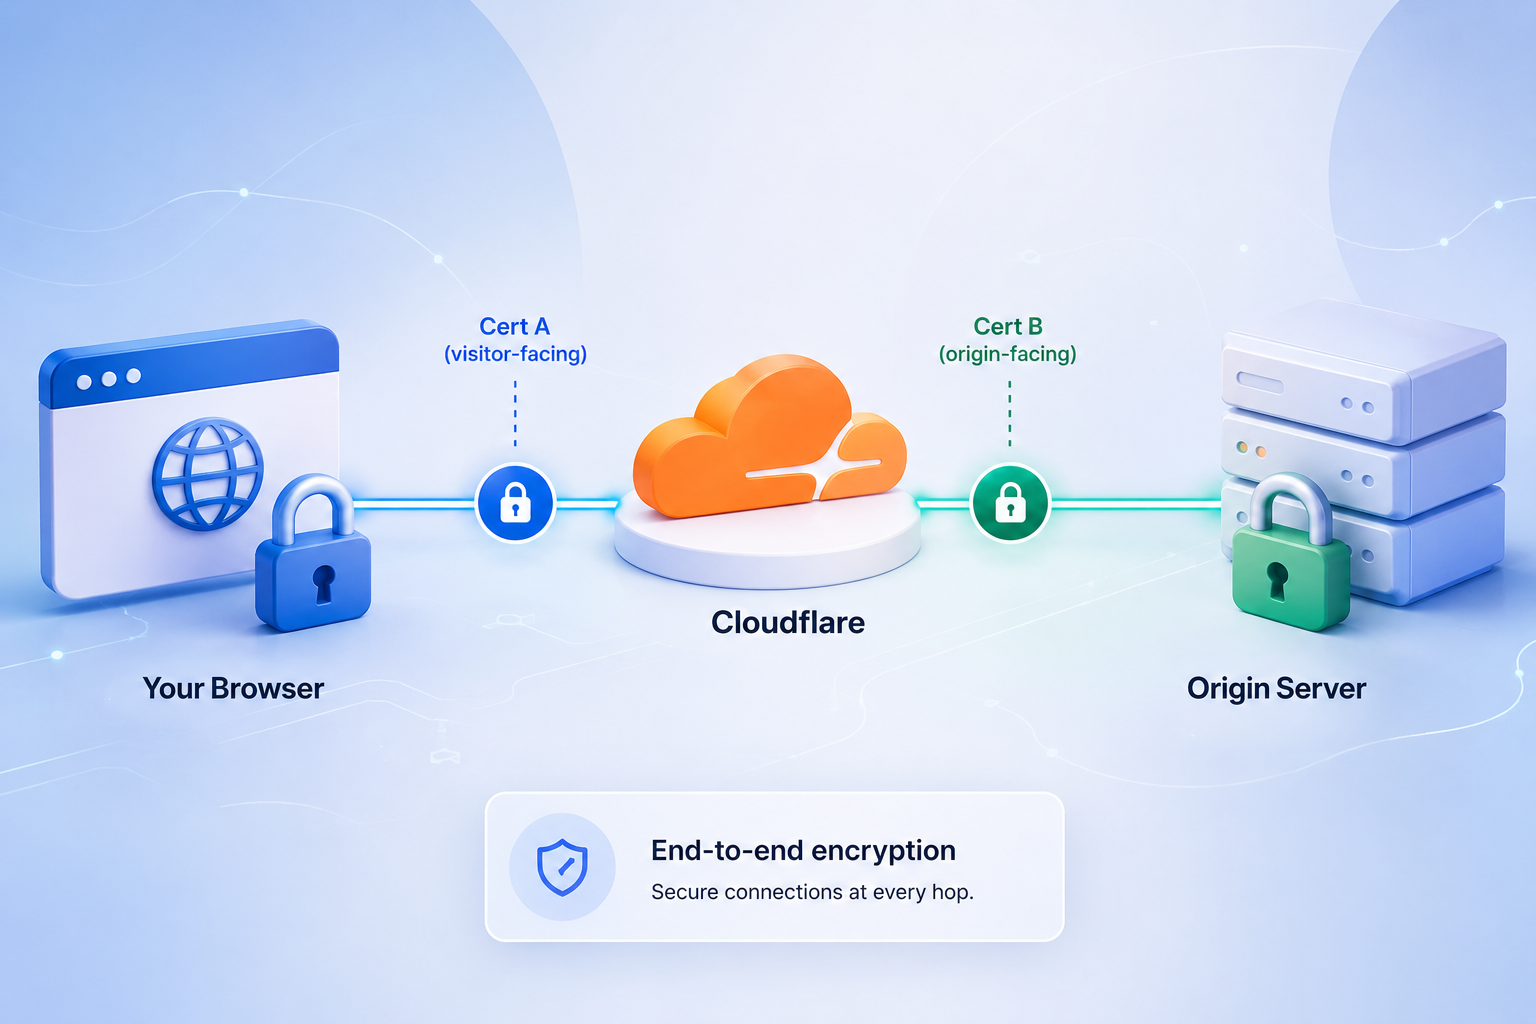
There are two certificates in this architecture, serving two different connection legs:
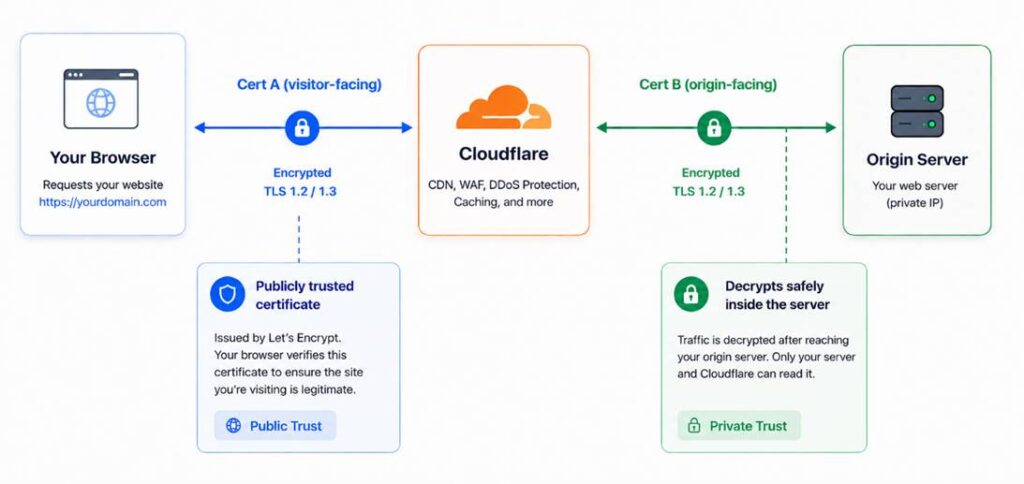
- Cert A (visitor-facing): Cloudflare automatically issues and presents this to your browser, via Let’s Encrypt or Google Trust Services. It’s publicly trusted. It’s the cert your browser sees.
- Cert B (origin-facing): The Cloudflare Origin Certificate you installed on your server. Cloudflare uses it when it talks to your origin. Browsers never see this certificate. They have no reason to.
So, when you click the padlock and see Let’s Encrypt — that’s Cert A doing its job. The Origin Certificate (Cert B) is invisible to the browser by design. The curl test in Step 4 is the only direct way to confirm it from outside Cloudflare.
If you don’t internalize this two-certificate model, you’ll be confused. Once you see it clearly, every other Cloudflare configuration question gets easier.
What Happened After
I explained all of this to the CTO and his team in that room. We walked through the four modes. We drew the diagrams. We mapped what they had against what they thought they had.
The CTO was thankful. The team was thankful. Within a week they had moved to Full (Strict), enabled Authenticated Origin Pulls, and added an item to their security review checklist so this would never sit unaddressed again.
Honestly, moments like that bring me great joy. The job of a cloud presales solutions architect is not to sell the biggest possible solution. It is to ask the one question that turns a confident “we are secure” into an honest “we have work to do” — and then to help them do that work.
If you take only one thing from this article, take this: the padlock in the browser is not a guarantee of end-to-end encryption. It is a guarantee that the browser is talking to something over TLS. What that something does next is up to you to verify.
A Question to Ask in Your Next Architecture Review
The next time someone tells you “we’re HTTPS, we’re on Cloudflare,” ask them this:
“What SSL/TLS mode are you running in Cloudflare — Off, Flexible, Full, or Full (Strict)? And have you verified the origin certificate with curl?”
If they don’t know the answer to the first half, you already know the answer. They’re not on Full (Strict). If they look puzzled at the second half, they haven’t verified the fix even if they claim it’s in place.
Help them get there. The curl one-liner takes thirty seconds and removes all ambiguity.
I write about the questions I ask in real customer rooms — the ones that change architectures and surface the problems no one else noticed. If you found this useful, drop your email below and I’ll send the next one when it’s ready.
FAQs
Can a hacker still sniff our data and get our secrets in plain text while our browser shows padlock (encryption)?
Yes – and that is when we don’t have end to end encryption.
Do I need paid SSL for end-to-end encryption?
No – Cloudflare edge certificates comes free of cost which you implement on origin server
Add Image
Can there be any router that would be compromised?
Yes – In cybersecurity, we assume the worst case scenario and build defenses over that assumptions
What’s the difference between Cloudflare Flexible, Full, and Full (Strict) SSL?
Flexible encrypts only the browser-to-Cloudflare leg and leaves Cloudflare-to-origin in plaintext — your traffic is exposed on the back half of the journey. Full encrypts both legs but doesn’t validate your origin’s certificate, so it’s still vulnerable to man-in-the-middle attacks. Full (Strict) encrypts both legs and validates the origin certificate against a trusted chain — this is real end-to-end TLS, and the only correct setting for production.
How do I verify my Cloudflare SSL configuration is correct?
Run two curl commands against your origin IP using –resolve to bypass Cloudflare. First with the -k flag: you should see a successful TLS handshake and HTTP 200. Then without -k: you should see SEC_E_UNTRUSTED_ROOT or a similar certificate-not-trusted error. That error is the verification — it proves your origin is serving the Cloudflare Origin Certificate (which is intentionally not publicly trusted), confirming only Cloudflare can connect.
Why does my browser show a Let’s Encrypt certificate instead of the Cloudflare Origin Certificate I installed?
This is correct behavior. Cloudflare’s architecture has two certificates serving two connection legs. Cert A (visitor-facing) is publicly trusted (Let’s Encrypt or Google Trust Services) and is what your browser sees. Cert B (origin-facing) is the Cloudflare Origin Certificate you installed on your server — Cloudflare uses it when talking to your origin, but browsers never see it. The padlock showing Let’s Encrypt confirms Cert A is doing its job; the curl test is the only way to verify Cert B from outside Cloudflare.